Untuk file-file konfigurasi CAS dapat diambil dari https://www.softbless.com/files/alfresco/CAS/deployment.zip
Prerequisite:
- Alfresco dan CAS harus menggunakan protokol HTTPS
- Katakan saja CAS menggunakan port 433 dan Alfresco 9443
- Setting Alfresco agar redirect dari port 8080 ke 9443
-
Pastikan Alfresco dan CAS dapat diakses dengan menggunakan domain name (tidak disarankan menggunakan IP Address), pada tutorial di bawah ini:
- Alfresco = http://alfresco.local
- CAS = http://cas.softbless.local

1. Tambahkan konfigurasi di bawah ini pada alfresco-global.properties:
#CAS
authentication.chain=cas:external
2. Copy service.xml ke C:\Alfresco\tomcat\shared\classes\alfresco\extension
3. Copy commonValues.properties ke C:\Alfresco\tomcat\shared\classes\alfresco\extension\messages
# CAS
cas_url=https://cas.softbless.local:443
cas_alfresco_url=https://alfresco.local:9443/alfresco
4. Copy folder mycompany ke dalam C:\Alfresco\tomcat\shared\classes\alfresco\extension\templates\webscripts\org
5. Copy custom-slingshot-application-context.xml ke dalam C:\Alfresco\tomcat\shared\classes\alfresco\web-extension. Pastikan berisi seperti di bawah ini:
<!-- Override Logout Controller - to expire Alfresco tickets -->
<bean id="logoutController" class="org.wwarn.cms.authentication.servlet.CASSlingshotLogoutController">
<property name="cacheSeconds" value="-1" />
<property name="useExpiresHeader"><value>true</value></property>
<property name="useCacheControlHeader"><value>true</value></property>
<property name="connectorService" ref="connector.service" />
<!-- if blank assumes the same as Share -->
<property name="casHost"><value>https://cas.softbless.local:443</value></property>
<property name="casPath"><value>logout</value></property>
</bean>
6. Edit file share-config-custom.xml pada C:\Alfresco\tomcat\shared\classes\alfresco\web-extension :
<config evaluator="string-compare" condition="Server">
<server>
<!-- Enable and adjust the following settings to allow for external access URLs to the
WebScript Framework - to return an externally accessible address for absolute url generation.-->
<scheme>https</scheme>
<hostname>alfresco.local</hostname>
<port>9443</port>
</server>
</config>
<!--Overriding endpoints to reference a remote Alfresco server –>-->
<config evaluator="string-compare" condition="Remote">
<remote>
<!-- Authenticator implementation used in CAS authentication scenario,
overrides the default alfresco-ticket authenticator
<class>org.alfresco.connector.AlfrescoAuthenticator</class> -->
<authenticator>
<id>alfresco-ticket</id>
<name>Alfresco Authenticator</name>
<description>Alfresco Authenticator</description>
<class>org.mycompany.cms.authentication.CasAlfrescoAuthenticator</class>
</authenticator>
<!-- Connects to an Alfresco instance using ticket-based authentication,
overrides the default alfresco connector to use ticket authenticator-->
<connector>
<id>alfresco</id>
<name>Alfresco Connector</name>
<description>Connects to an Alfresco instance using ticket-based authentication</description>
<class>org.springframework.extensions.webscripts.connector.AlfrescoConnector</class>
<authenticator-id>alfresco-ticket</authenticator-id>
</connector>
<!-- Endpoint using external authentication via CAS-->
<endpoint>
<id>alfresco</id>
<name>Alfresco - user access</name>
<description>Access to Alfresco Repository WebScripts that require external user authentication
</description>
<connector-id>alfresco</connector-id>
<endpoint-url>https://alfresco.local:9443/alfresco/s</endpoint-url>
<identity>user</identity>
<external-auth>true</external-auth>
</endpoint>
</remote>
</config>
7. Edit file webscript-framework-config-custom.xml pada C:\Alfresco\tomcat\shared\classes\alfresco\web-extension :
<config evaluator="string-compare" condition="Remote">
<remote>
<endpoint>
<id>alfresco-noauth</id>
<name>Alfresco - unauthenticated access</name>
<description>Access to Alfresco Repository WebScripts that do not require authentication</description>
<connector-id>alfresco</connector-id>
<endpoint-url>https://alfresco.local:9443/alfresco/s</endpoint-url>
<identity>none</identity>
</endpoint>
<endpoint>
<id>alfresco</id>
<name>Alfresco - user access</name>
<description>Access to Alfresco Repository WebScripts that require user authentication</description>
<connector-id>alfresco</connector-id>
<endpoint-url>https://alfresco.local:9443/alfresco/s</endpoint-url>
<identity>user</identity>
</endpoint>
<endpoint>
<id>alfresco-feed</id>
<name>Alfresco Feed</name>
<description>Alfresco Feed - supports basic HTTP authentication</description>
<connector-id>http</connector-id>
<endpoint-url>https://alfresco.local:9443/alfresco/s</endpoint-url>
<basic-auth>true</basic-auth>
<identity>user</identity>
</endpoint>
</remote>
</config>
<config evaluator="string-compare" condition="Remote">
<remote>
<keystore>
<path>alfresco/web-extension/alfresco-system.p12</path>
<type>pkcs12</type>
<password>alfresco-system</password>
</keystore>
<endpoint>
<id>alfresco</id>
<name>Alfresco - user access</name>
<description>Access to Alfresco Repository WebScripts that require user authentication</description>
<connector-id>alfresco</connector-id>
<endpoint-url>https://alfresco.local:9443/alfresco/wcs</endpoint-url>
<identity>user</identity>
<external-auth>true</external-auth>
<authenticator-id>alfresco-ticket</authenticator-id>
</endpoint>
</remote>
</config>
8. Edit file relogin.jsp pada C:\Alfresco\tomcat\webapps\alfresco\jsp, tambahkan code di bawah sebelum tanda %> response.addCookie(authCookie);
// deconnection CAS
response.sendRedirect("https://cas.softbless.local:443/logout");
9. Copy library alfresco-cas.jar dan cas-client-core-3.1.12.jar ke dalam folder C:\Alfresco\tomcat\webapps\alfresco\WEB-INF\lib
10. Copy file web.xml ke dalam C:\Alfresco\tomcat\webapps\alfresco\WEB-INF, pastikan code CASnya seperti di bawah ini :
<!-- Adding CAS Authentication filters and replacing Alfresco's default one -->
<filter>
<filter-name>Authentication Filter</filter-name>
<filter-class>org.jasig.cas.client.authentication.AuthenticationFilter</filter-class>
<init-param>
<param-name>casServerLoginUrl</param-name>
<param-value>https://cas.softbless.local:443/login</param-value>
</init-param>
<init-param>
<param-name>serverName</param-name>
<param-value>https://alfresco.local:9443</param-value>
</init-param>
</filter>
<filter>
<filter-name>CAS Validation Filter</filter-name>
<filter-class>org.jasig.cas.client.validation.Cas20ProxyReceivingTicketValidationFilter</filter-class>
<init-param>
<param-name>casServerUrlPrefix</param-name>
<param-value>https://alfresco.local:443</param-value>
</init-param>
<init-param>
<param-name>serverName</param-name>
<param-value>https://alfresco.local:9443</param-value>
</init-param>
</filter>
<filter>
<filter-name>Alfresco CAS Authentication Filter</filter-name>
<filter-class>org.mycompany.cms.authentication.CasAuthenticationFilter</filter-class>
</filter>
<!-- End adding CAS authentication filters -->
11. Copy library cas-client-core-3.1.12.jar, logoutCAS.jar, dan share-CAS.jar ke dalam folder C:\Alfresco\tomcat\webapps\share\WEB-INF\lib
12. Copy file web.xml ke dalam C:\Alfresco\tomcat\webapps\share\WEB-INF, pastikan code CASnya seperti di bawah ini :
<!-- Adding CAS Authentication filters -->
<filter>
<filter-name>CAS Authentication Filter</filter-name>
<filter-class>org.jasig.cas.client.authentication.AuthenticationFilter</filter-class>
<init-param>
<param-name>casServerLoginUrl</param-name>
<param-value>https://cas.softbless.local:443/login</param-value>
</init-param>
<init-param>
<param-name>serverName</param-name>
<param-value>https://alfresco.local:9443</param-value>
</init-param>
</filter>
<filter>
<filter-name>CAS Validation Filter</filter-name>
<filter-class>org.jasig.cas.client.validation.Cas20ProxyReceivingTicketValidationFilter</filter-class>
<init-param>
<param-name>casServerUrlPrefix</param-name>
<param-value>https://cas.softbless.local:443</param-value>
</init-param>
<init-param>
<param-name>serverName</param-name>
<param-value>https://alfresco.local:9443</param-value>
</init-param>
<init-param>
<param-name>allowAnyProxy</param-name>
<param-value>true</param-value>
</init-param>
<init-param>
<param-name>proxyCallbackUrl</param-name>
<param-value>https://alfresco.local:9443/share/proxyCallback</param-value>
</init-param>
<init-param>
<param-name>proxyReceptorUrl</param-name>
<param-value>/proxyCallback</param-value>
</init-param>
</filter>
<filter>
<filter-name>Alfresco CAS Authentication Filter</filter-name>
<filter-class>org.mycompany.cms.authentication.CasAuthenticationFilter</filter-class>
</filter>
<!-- End adding CAS authentication filters -->
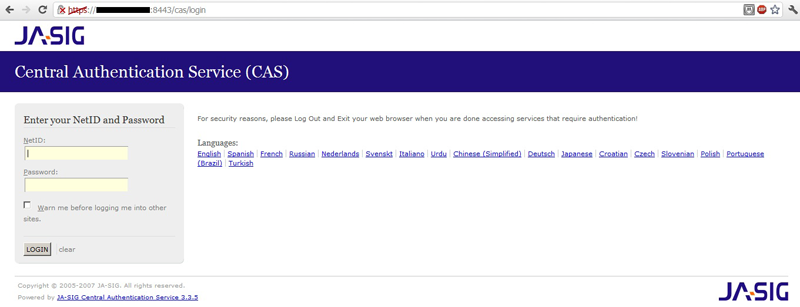
13. Akses Alfresco dari IE alfresco.local:8080/share, akan redirect ke login CAS. Kemudian login akan muncul dashlet Alfresco.
Referensi:
ecmstuff.blogspot.com/2011/06/configuring-alfresco-for-sso-with-cas.html

holisticsecurity.wordpress.com/2011/02/19/web-sso-between-liferay-and-alfresco-with-cas-and-penrose-part-22/

akselsarchitecture.blogspot.com/2010/09/cas-sso-for-alfresco-33-and-share.html

blog.atolcd.com/?p=115

